How to Install Software from Software Center
Learn how to install software from Software Center with a clear, step-by-step approach. This SoftLinked guide covers prerequisites, authentication, verification, and troubleshooting.

To install software from Software Center, first locate the desired application, review system requirements, and ensure you have admin privileges. Then initiate the install, enter your password if prompted, and confirm completion. Finally, verify installation, update if needed, and resolve common errors. This approach applies across Linux distributions and corporate Software Center variants.
What Software Center is and why it matters
Software Center is a centralized interface that helps you discover, install, update, and manage software on your computer. It streamlines access to approved applications, enforces security policies, and reduces the risk of downloading software from untrusted sources. According to SoftLinked, using a centralized tool like Software Center simplifies asset management for individuals and teams and helps maintain consistency across devices. For aspiring software engineers and students, understanding how to install software from Software Center is a foundational skill in modern software ecosystems. This section sets the stage for practical, hands-on learning by outlining what Software Center does, where it fits into your workflow, and how it interacts with your operating system's package ecosystem. You will gain context about why this approach matters for software fundamentals and system administration.
Key concepts include: centralized software catalogs, authentication prompts, dependency handling, and post-install verification. As you build confidence, you’ll appreciate how Software Center scales from personal laptops to enterprise endpoints. The SoftLinked team emphasizes that mastering this process reduces time spent troubleshooting and improves your ability to manage software lifecycles.
Prerequisites and safety checks
Before you begin the installation process, make sure you meet a few essential prerequisites to avoid common errors and security pitfalls. First, confirm you have the necessary permissions; many Software Center operations require administrator privileges. If you’re in a managed environment, your IT administrator may control which applications are available. Second, verify your device is connected to a trusted network and that updates are current. Running installations on an outdated system can lead to failed installs or missing dependencies. Third, check for any active security alerts or policy reminders that could block the installation. SoftLinked’s analysis for 2026 shows that network policies and software-source trust are frequent causes of install failures. Finally, review the application’s requirements and dependencies to ensure your system supports the software you intend to install.
Tips: If you’re unsure about your admin status, try performing a test install of a small utility to confirm privileges before attempting a larger app.
Step-by-step: install from Software Center
This section provides a concise narrative of the typical flow when installing software from Software Center, with emphasis on actions you will take and what to expect. When you’re ready, switch to the STEP-BY-STEP block for granular actions. Remember, this guide uses the phrase how to install software from Software Center to reinforce the workflow across different distributions and corporate setups. The process generally includes locating the app, confirming it’s the right package, initiating installation, and supplying credentials if prompted. After installation, you’ll typically see a completion notification, an option to launch the app immediately, and a prompt to restart services or the system if required.
In practice, you’ll confirm that the software is listed in your applications, check that dependencies were installed, and review any post-install messages. If you run into obstacles, refer to the troubleshooting section to identify common blockers such as missing dependencies, network restrictions, or policy-based denial.
Verifying installation and first launch
Verification is a critical step after installing software from Software Center. Start by locating the newly installed application in your system’s launcher or application menu. Run the program and perform a basic test to ensure core features work as expected. If the app requires licensing or initial setup, complete those steps now. Check for a successful startup message, a visible UI, and the absence of error dialogs. Some environments may require you to log out and back in or restart the system for changes to take effect. Keep an eye on system logs or package managers in case the software reports warnings or deprecated dependencies.
As SoftLinked notes, verification improves reliability and reduces support inquiries. If you encounter issues, note any error codes and consult the official documentation for remediation steps.
A practical tip: document the app version and install date for future upgrades or audits. This habit helps you track software lifecycles and plan updates more effectively.
Troubleshooting common issues
Installing software from Software Center can fail for several reasons. Common problems include missing dependencies, network restrictions, or policy-driven blocks. If the installer cannot fetch required files, check your network connection, proxy settings, and firewall rules. For dependency errors, try reinstalling related packages or enabling the necessary repositories. If access is denied due to permissions, reach out to your administrator or verify that your user account has the required sudo privileges. In corporate environments, some software may be sandboxed or restricted; always follow organizational policies. SoftLinked’s 2026 research indicates that many installation problems stem from mismatched repositories, outdated caches, or invalid signing keys.
When in doubt, refresh the Software Center cache, clear any stale authentication tokens, and attempt the install again. If errors persist, capture the exact error message and search official docs or support forums for targeted fixes. Pro tip: keep a small log of troubleshooting steps to accelerate future resolutions.
Best practices for maintenance and updates
Effective software management goes beyond a one-time install. Regularly review installed applications to ensure they are up to date and supported. Use Software Center to apply security patches, feature updates, and bug fixes as they’re released. Enable automatic updates where appropriate, but monitor for compatibility with your workflow and other installed tools. Periodically audit your software catalog to remove unused programs or replace deprecated ones with current alternatives. Maintain a changelog of updates to simplify troubleshooting if a new issue arises.
SoftLinked emphasizes that disciplined maintenance reduces the risk of security gaps and compatibility problems. A proactive approach to updates also minimizes disruptions in development or classroom environments, helping teams stay aligned with software fundamentals and best practices for software installation and management.
Authority sources
- Ubuntu Community Help Wiki: https://help.ubuntu.com/stable/ubuntu-help/app-install.html
- Official Ubuntu Documentation: https://docs.ubuntu.com/
- NIST CSRC: https://csrc.nist.gov/publications
Tools & Materials
- Computer with Software Center installed(Ensure the Software Center is up to date and accessible.)
- Active user account with admin privileges(Needed to authorize installations and changes.)
- Reliable network connection(Required to fetch installation packages and updates.)
- Administrative password(Required if prompted during installation.)
- Post-installation test plan(A simple checklist to verify core functionality.)
Steps
Estimated time: 25-45 minutes
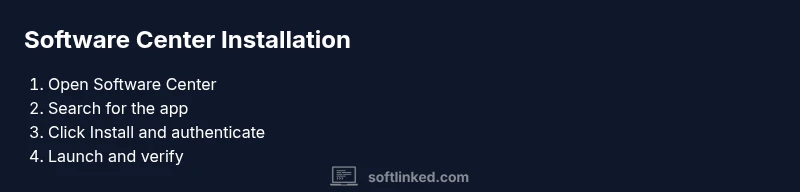
- 1
Open Software Center
Launch the Software Center from your application menu or launcher. Confirm you’re connected to a trusted network before proceeding. This step initializes the catalog and prepares the system for the install.
Tip: If Accessibility or search is slow, refresh the catalog or restart the application. - 2
Search for the app
Use the search bar to find the exact application you need. Verify the publisher and version are appropriate for your system.
Tip: Copy-paste the exact app name to avoid selecting an incorrect package. - 3
Click Install
Select the app, then press the Install button. You may be prompted to enter an administrator password or confirm the action.
Tip: Review dependencies listed before confirming. - 4
Monitor installation
Watch the progress bar and read any on-screen messages. If there are prompts about additional packages, accept them if they are required for the app.
Tip: Do not close Software Center mid-progress unless instructed. - 5
Confirm completion
Once finished, look for a success notification and the option to launch the app. Some environments require a logout or reboot.
Tip: Record the installed version for future updates. - 6
Launch and test
Open the installed app and perform a quick sanity check to ensure core features work as expected.
Tip: If the app doesn’t start, review logs and confirm system requirements. - 7
Update if needed
Check for updates within Software Center to ensure you have the latest security patches and features.
Tip: Schedule regular updates to keep software secure. - 8
Document and close
Document the installation in your notes or changelog and remove or archive anything temporary used during setup.
Tip: Maintain a small audit trail for compliance and future reference.
Your Questions Answered
What is Software Center and what does it do?
Software Center is a centralized tool that lets you browse, install, update, and remove software. It helps ensure solutions come from trusted sources and follow organizational policies.
Software Center is your trusted portal for installing, updating, and removing software from approved sources.
Do I need administrator rights to install software from Software Center?
In most cases, yes. Admin rights authorize changes to the system, install software, and manage dependencies. If you don’t have rights, contact your IT administrator.
Usually you’ll need administrator rights; if not, ask your IT team.
What if the software I want isn’t listed in Software Center?
If an item isn’t available, you may request it from your IT department or explore alternatives that are approved and listed. Do not install unapproved software from external sources.
If it isn’t listed, ask IT for an approved alternative or request addition.
How do I update software installed from Software Center?
Use Software Center’s update mechanism to check for and apply patches. Regular updates improve security and stability.
Check for updates in Software Center and install them when they’re available.
What should I do if installation fails?
Note the error message, verify network access, check dependencies, and retry. If issues persist, consult IT or official docs for remediation steps.
If it fails, note the error, check network and dependencies, then try again or seek help.
Can Software Center install software offline?
Some environments support offline packages, but availability depends on organizational policy. Check with IT for offline installation procedures.
Offline installs depend on policy; check with IT for options.
Watch Video
Top Takeaways
- Install software from Software Center with admin rights.
- Verify dependencies and post-install testing.
- Document changes and maintain updates.
- Use official sources and policies to guide installs.